
New Products
Giraffe Sockett® Assembly Directions & Photos
For this project you will need:
1 Giraffe Sockett® kit
1 pair good *craft scissors
1 *glue gun/glue.
*Supervise children when these items are in use. 
For BEST results follow these 6 suggestions:
- Read through ALL of the directions at least once and before beginning assembly on your Giraffe Sockett®.
- Assemble all the parts before gluing them to the sock puppet.
- "Check twice, glue once!" in other words, practice placing parts before adding glue so they go exactly where you want them to. Small moves matter!
- Use the included chalk to mark placement.
- Keep in mind that hot glue dries very quickly. Unless otherwise indicated, use small drops of glue and glue as you go. We have illustrated this in different sections of these directions.
- Have Fun!!
ASSEMBLY: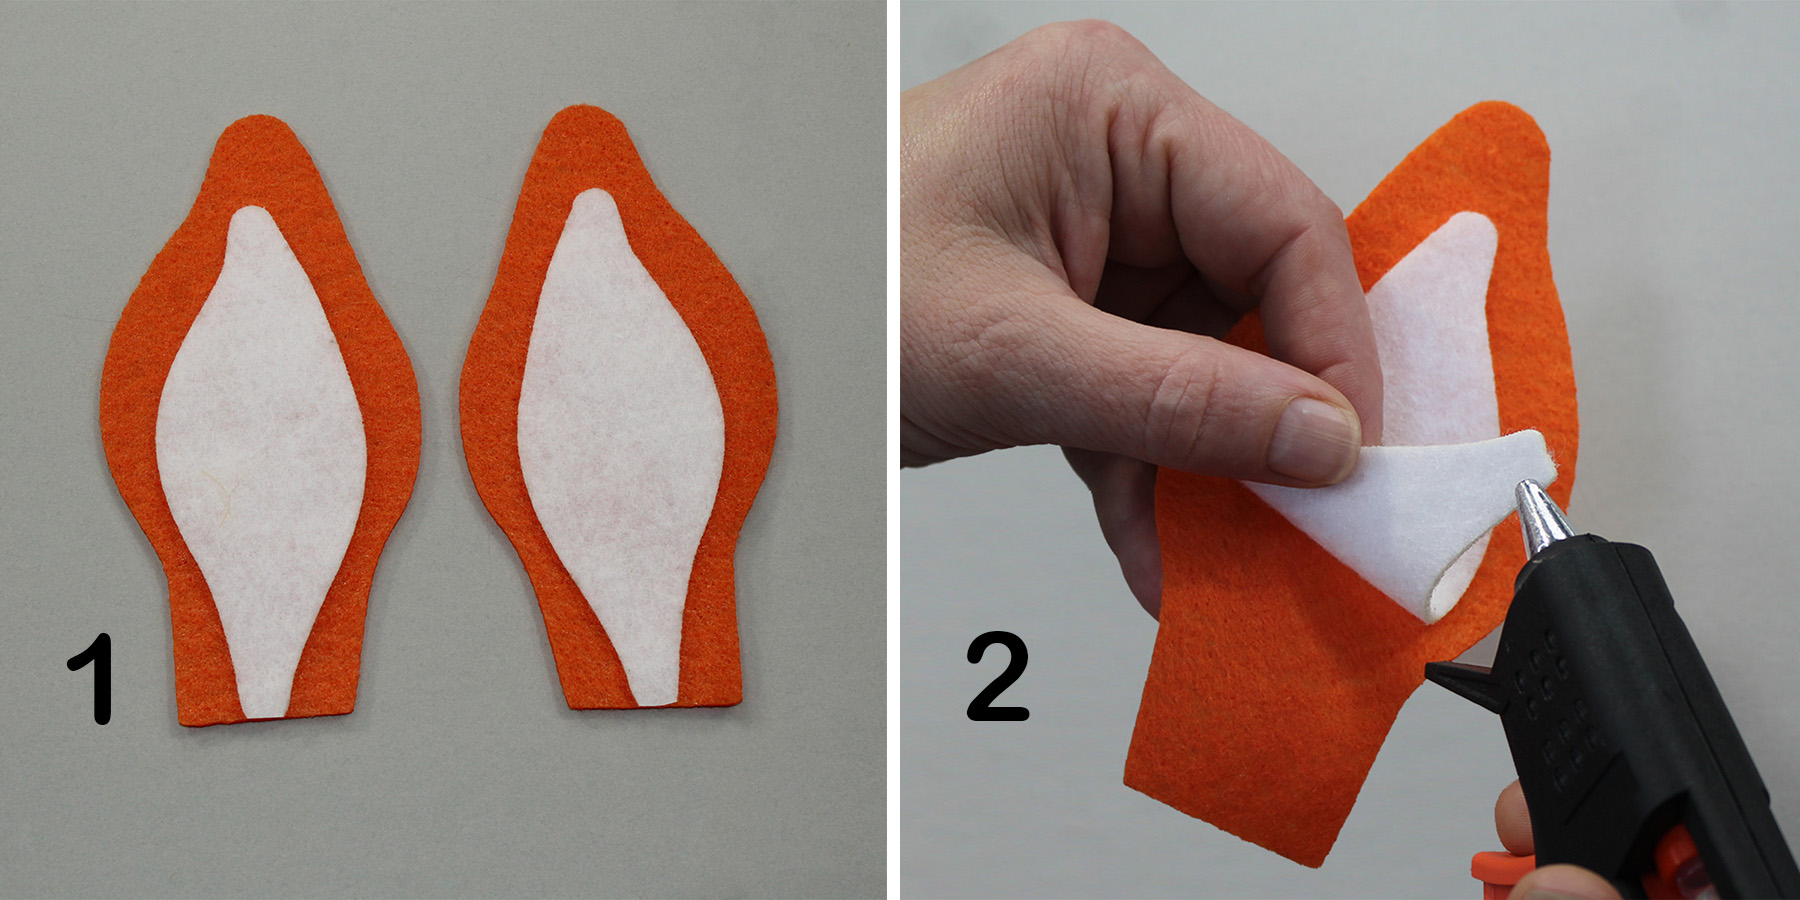
ASSEMBLE EARS: {*Hint* Make sure Ears are facing the correct direction before adding any glue}. Center the Inner Ear inside the Outer Ear aligning the bottom edges [1]. Glue Inner Ear to Outer Ear in sections starting from the "stem" and working up [2]. 
Once Inner Ears and Outer Ears are glued together, add glue to one side of the ear stem [3]. Pinch the stem closed until glue dries [4]. Slide the Ear Buttons onto ear stems [5].
ASSEMBLE EYES: Seperate the Eye parts [1]. Assemble and glue the Eye Base, Sclera, & Pupil together as shown [2] {*Hint* The Sclera should be centered in the Eye Base. Take care not to glue the Sclera and Pupil too high}. 
EYE LIDS: Align the curved edge of the Eye Lid with the curved top edge of the Eye Base. Hold the Lid in place with thumb and forfinger. Carefully glue Lid to Eye as shown. [3-4]. {*Hint*: practice attaching the Lid to the Eye before adding any glue}. 
LASHES: Place a solid line of glue along the flat edge of the Lashes [5]. Carefully glue Eye Lash to Eye Lid as shown [6].
ASSEMBLE HORNS: Place a few drops of glue in a straight line about 1/4" from the edge of the Horn [1]. Gently roll the Horn once, adhereing it to the glue [2]. Place another line of glue next to the fold [2] and roll the horn again. Repeat glue/roll motion 4-5 times until the Horn is completely rolled [3]. Glue Horn Pom to one end of each of the completed Horns [4].
PERFECT PLACEMENT: Put the Sock all the way on your hand with your fingers touching the toe and the mouth in your palm. Using the Chalk, draw 2 centered lines on your knuckles 2.5" apart. This is where the Ears will go. Draw a second pair of chalk lines on your finger joints, centered 1.25" apart. This is where the Eyes will go. Lastly, make a third pair of chalk marks on the toe seam, parallel to the Eye marks. These is where the Nostrils will go.
ATTACH EARS: Adjust the Ear Buttons so both Ears the same height. Trim the Ear stem leaving a 1/4" nub extending below the Ear Button [1]. Add glue to the underside of the button on and around the nub [2]. Promptly glue to a chalk mark you drew for the Ear [3]. Lift the button and neatly glue down the edges [3]. Repeat with second ear {*Hint* To avoid making mistakes, practice placing the Ear on the chalk mark before adding any glue!} 


ATTACH HORNS: Adjust Horn Buttons so Horns are the same height [1]. Trim off One side of the button [2] leaving a 1/2" of felt [4]. Next, trim the Horn stem almost flush with the Horn Button leaving a small nub [3-4]. Add glue on and around the nub where it meets the Horn Button [5]. Glue Horn to the Giraffe with the flat edge of the Horn Button pushed against the Ear and overlapping the Ear Button as shown [6]. Carefully lift the Horn Button and neatly glue down the edges [7]. Repeat with other Horn [8].

ATTACH MANE: {*Hint* Applying small drops rather than long lines of glue should make the mane less stiff and the puppet more flexible.} Turn the Mane over so backing side is up. Squeeze a line of glue drops across one end [1]. Adhere the glued end between the giraffe's Ears and overlapping the Horn Buttons. Secure where indicated [2] (Do Not glue past the Horn Buttons). Lift the Mane and add another line of glue drops [3], secure Mane to sock, smooth and repeat. Continue gluing the Mane in sections [4] until the entire Mane is glued down. 
ATTACH EYES: Add glue to the FRONT of the Eye tab as shown [1] Adhere to chalk mark [2]. Repeat with other Eye.

Glue an Eye Pom on top of an eye tab [3]. Add glue to the back of the Eye at Pom level [3]. Lift Eye and adhere to Pom. Hold in place until glue dries and Eye is completely secured. Repeat with other Eye.[4]. ATTACH NOSTRILS: Put a drop of glue on the back of a Nostril and adhere it to one f the chalk marks you made on the toe seam [1]. Repeat step with second nostril. Violá! Your Giraffe is ready to play!!