
New Products
"Ting" Easy Step x Step Directions:
For this project you will need:
1 Ting Sockett® kit by Tigercandy Arts, Inc.
1 hot glue gun & 1-2 glue sticks (supervise kids when these items are in use!)
1 pair of good craft scissors
----------------------------
Items in your kit:

Step 1, Materials & Directions: Lay out your materials and read through the directions entirely at least once before beginning assembly. We recommend assembling all the parts before attaching them to the sock base!
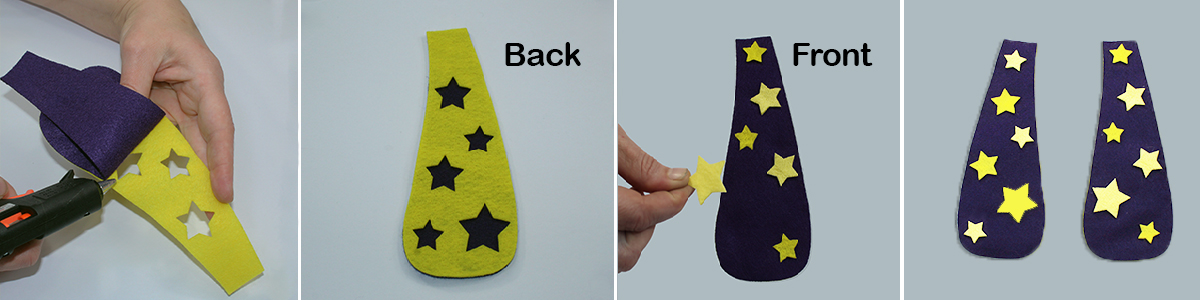
Step 2, Ears: {*Hint* Make sure both ears are facing the correct direction before you add any glue}. Allign the inner and outer ear. Using small drops of hot glue, work from the bottom of the ear up, as you glue the parts together ear together. Repeat with the second ear. Add decorative yellow stars to the front (purple) sides of both ears. {*Hint* Reserve some stars for the body if desired}. When both ears are made, set them aside.
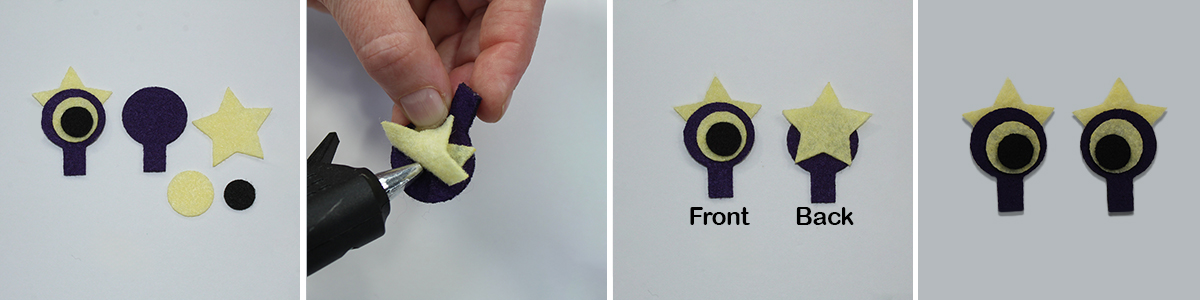
Step 3, Eyes: Glue the eye star to the back of the eye base. To the front, glue the sclera and the pupil. Good eye contact is the secret to an engaging puppet! The BEST way to achieve good eye contact is to triangulate the pupil. This means avoid placing the pupils dead center in the sclera. Rather, place them ever so slightly towards the inner edge, forming an invisible triangle with the nose. Do Not add any glue until you have achieved your desired placement. Make the eyes and set them aside.
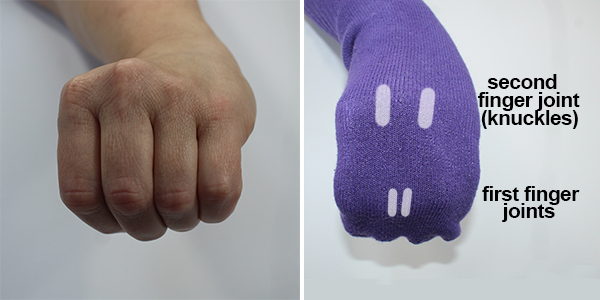
Step 4, Proper Placement: Put the sock on your hand so the mouth is in your palm. Locate your knuckles (second finger joints) and draw two, small, chalk marks centered no more than an inch apart. This will be where the ears will go. Next, locate your first nuckle joints and make two, small marks next to eachother. These should fall between the ears. This is where the eyes will go.
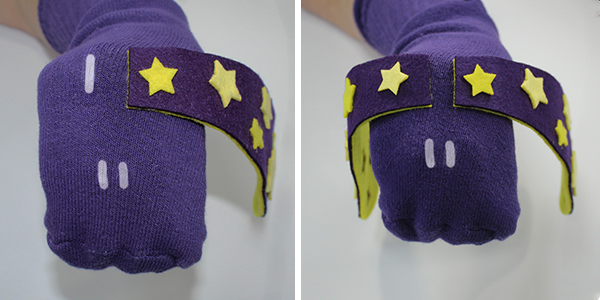
Step 5, Attach Ears: Before adding glue, make sure your ears are facing the correct direction then put a thin line of glue along the top edge on the underside (yellow side) of one ear and adhere to a chalk line. {*Hint* proceed carefully with glue. You can always add more if needed} Repeat with second ear.
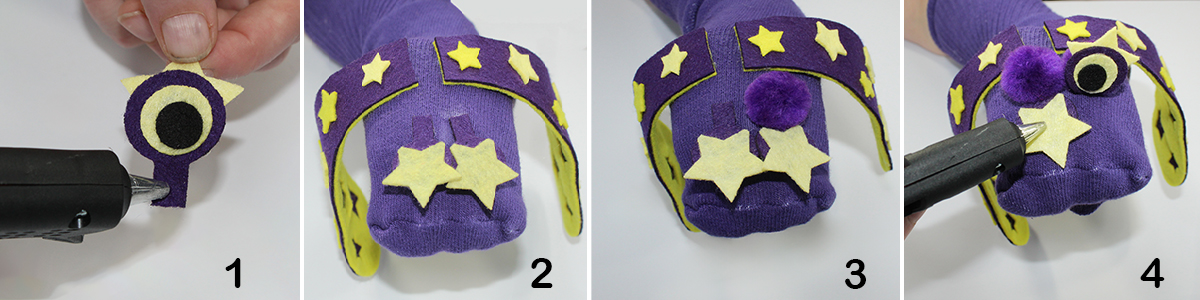
Step 6, Eye Placement: Add glue to the front of the eye base stem (1) and glue it face down on chalk mark (2). Then, glue a pom pom to the flat stem(3), then glue back of eye to the pom pom (4).

Step 7, Extra Stars & Faux Fur Tuft: Glue some of the stars to the body and the faux fur between the ears as shown and "Tada! your Ting is ready to play!
For this project you will need:
1 Ting Sockett® kit by Tigercandy Arts, Inc.
1 hot glue gun & 1-2 glue sticks (supervise kids when these items are in use!)
1 pair of good craft scissors
----------------------------
Items in your kit:
Step 1, Materials & Directions: Lay out your materials and read through the directions entirely at least once before beginning assembly. We recommend assembling all the parts before attaching them to the sock base!
Step 2, Ears: {*Hint* Make sure both ears are facing the correct direction before you add any glue}. Allign the inner and outer ear. Using small drops of hot glue, work from the bottom of the ear up, as you glue the parts together ear together. Repeat with the second ear. Add decorative yellow stars to the front (purple) sides of both ears. {*Hint* Reserve some stars for the body if desired}. When both ears are made, set them aside.
Step 3, Eyes: Glue the eye star to the back of the eye base. To the front, glue the sclera and the pupil. Good eye contact is the secret to an engaging puppet! The BEST way to achieve good eye contact is to triangulate the pupil. This means avoid placing the pupils dead center in the sclera. Rather, place them ever so slightly towards the inner edge, forming an invisible triangle with the nose. Do Not add any glue until you have achieved your desired placement. Make the eyes and set them aside.
Step 4, Proper Placement: Put the sock on your hand so the mouth is in your palm. Locate your knuckles (second finger joints) and draw two, small, chalk marks centered no more than an inch apart. This will be where the ears will go. Next, locate your first nuckle joints and make two, small marks next to eachother. These should fall between the ears. This is where the eyes will go.
Step 5, Attach Ears: Before adding glue, make sure your ears are facing the correct direction then put a thin line of glue along the top edge on the underside (yellow side) of one ear and adhere to a chalk line. {*Hint* proceed carefully with glue. You can always add more if needed} Repeat with second ear.
Step 6, Eye Placement: Add glue to the front of the eye base stem (1) and glue it face down on chalk mark (2). Then, glue a pom pom to the flat stem(3), then glue back of eye to the pom pom (4).
Step 7, Extra Stars & Faux Fur Tuft: Glue some of the stars to the body and the faux fur between the ears as shown and "Tada! your Ting is ready to play!